结合使用配置中心实现平滑的灰度发布(0.0.7)
在0.0.6-SNAPSHOT中我们已经演示了如何实现灰度发布,但缺点是我们需要在恢复发布的过程中修改本地microservice.yaml配置并重启边缘服务才能使灰度策略生效,现在我们在0.0.7-SNAPSHOT中结合使用配置中心的动态发布能力来改进它。
ServiceComb支持的配置中心
ServiceComb支持两种配置中心:
Configuration Center
这是默认的配置中心,尚未开源。
Apollo
Apollo是携程开发的一个开源配置中心,ServiceComb已经做了良好的对接,如何使用请参考此文,我们将使用它作为配置中心。
改进方案
现在我们详细描述改进方案:
- 首先我们将
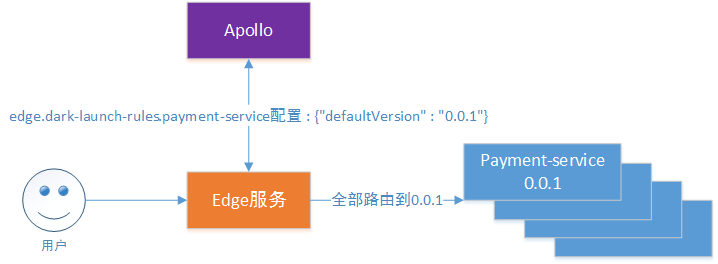
edge.dark-launch-rules.payment-service的配置从microservice.yaml本地配置中移动到Apollo配置中心:
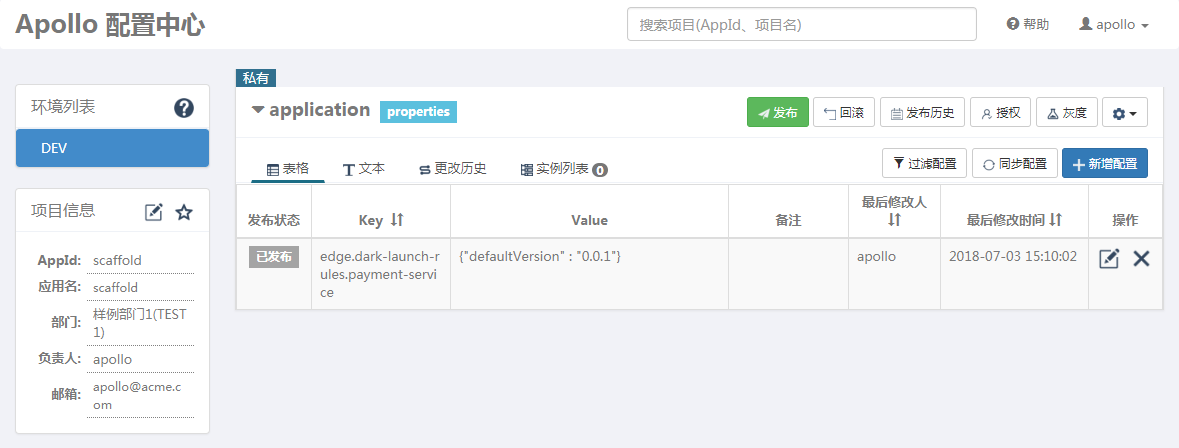
配置的值是:
{"defaultVersion" : "0.0.1"}
当前生效的路由为:
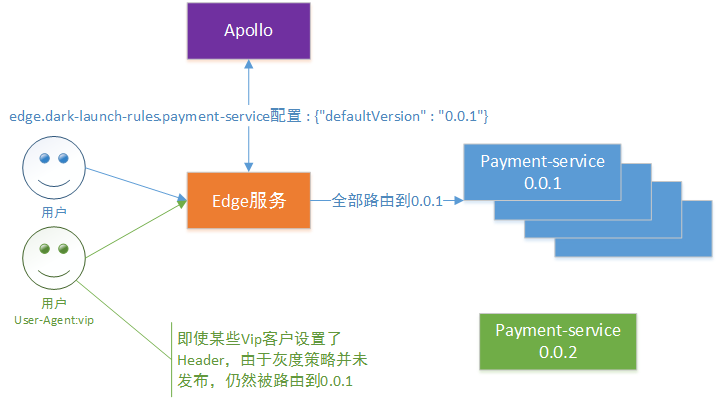
- 然后我们将0.0.2版本的新版支付服务上线,因为此时配置尚未更改并发布,边缘服务并不会将用户的请求路由到0.0.2版本的微服务实例上:
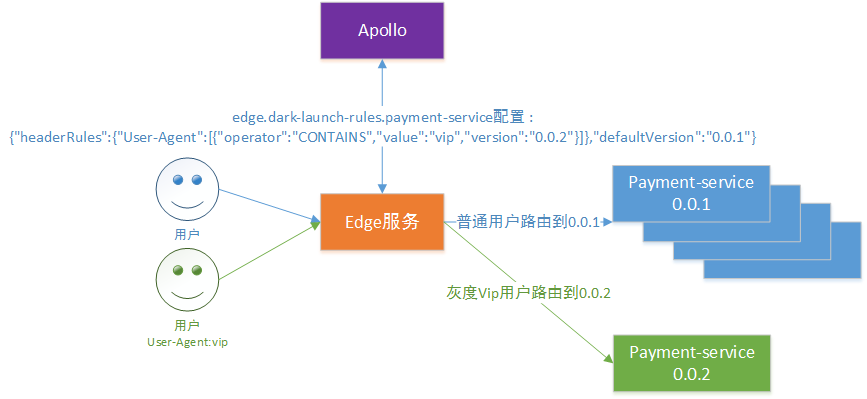
- 一切就绪后,我们在Apollo中修改edge.dark-launch-rules.payment-service的配置,使能灰度发布:

配置的值是:
{"headerRules":{"User-Agent":[{"operator":"CONTAINS","value":"vip","version":"0.0.2"}]},"defaultVersion":"0.0.1"}
将带有User-Agent Header并且值包含vip字符串的请求路由到0.0.2版本的微服务实例:
至此,只要接口不发生变化,新版本即可采用实例上线->修改路由配置的方式实现灰度发布,无需修改任何代码和重启边缘服务。
修改边缘服务的实现以支持方案
添加动态配置依赖
我们在边缘服务中添加如下依赖:
<!--增加使用Apollo作为配置中心-->
<dependency>
  <groupId>com.netflix.archaius</groupId>
  <artifactId>archaius-core</artifactId>
</dependency>
<dependency>
  <groupId>org.apache.servicecomb</groupId>
  <artifactId>config-apollo</artifactId>
</dependency>
在microservice.yaml中添加配置中心配置
edge:
  routing-short-path:
    user: user-service
    payment: payment-service
#  停用本地配置,使用apollo配置中心配置
#  dark-launch-rules:
#    payment-service: "{\"headerRules\":{\"User-Agent\":[{\"operator\":\"CONTAINS\",\"value\":\"vip\",\"version\":\"0.0.2\"}]},\"defaultVersion\":\"0.0.1\"}"

#配置中心
apollo:
  config:
    #请修改为您的Apollo地址
    serverUri: http://192.168.99.100:8070
    #请修改为您的Apollo AppId
    serviceName: scaffold  #AppId in apollo
    env: DEV
    #default clusters name in apollo,if user create new clusters please replace this setting value
    #more detail can be found at https://github.com/ctripcorp/apollo/wiki
    clusters: default
    #default namespace name in apollo,if user create new namespace please replace this setting value
    #more detail can be found at https://github.com/ctripcorp/apollo/wiki/Apollo%E6%A0%B8%E5%BF%83%E6%A6%82%E5%BF%B5%E4%B9%8B%E2%80%9CNamespace%E2%80%9D
    namespace: application
    #get token from Apollo web pages
    #请修改为您的Token
    token: d453c813eb2e0a83bd4532bca7b0c272bc3377c9
请按本地Apollo的配置替换其中的配置项,如何获取这些配置请参考动态配置。
修改EdgeDispatcher,强化灰度策略执行效率
private void onRequest(RoutingContext context) {
  Map<String, String> pathParams = context.pathParams();
  //从匹配的param0拿到{ServiceComb微服务Name}
  final String service = pathParams.get("param0");
  //从匹配的param1拿到{服务路径&参数}
  String operationPath = "/" + pathParams.get("param1");

  //还记得我们之前说的做出一点点改进吗?引入一个自定义配置edge.routing-short-path.{简称},映射微服务名;如果简称没有配置,那么就认为直接是微服务的名
  final String serviceName = DynamicPropertyFactory.getInstance()
      .getStringProperty("edge.routing-short-path." + service, service).get();

  //检查灰度策略是否更新
  checkDarkLaunchRule(serviceName);

  //创建一个Edge转发
  EdgeInvocation edgeInvocation = new EdgeInvocation();
  //设定灰度版本策略
  edgeInvocation.setVersionRule(
      darkLaunchRules.get(serviceName).getRule().matchVersion(context.request().headers().entries()));
  edgeInvocation.init(serviceName, context, operationPath, httpServerFilters);

  //处理Filter链并转发请求
  loopExecuteEdgeFilterInChain(0, serviceName, operationPath, context, edgeInvocation);
}

private void checkDarkLaunchRule(String serviceName) {
  final String config = DynamicPropertyFactory.getInstance()
      .getStringProperty("edge.dark-launch-rules." + serviceName, "").getValue();
  if (darkLaunchRules.containsKey(serviceName)) {
    DynamicDarkLaunchRule rule = darkLaunchRules.get(serviceName);
    if (!rule.getConfig().equals(config)) {
      darkLaunchRules.put(serviceName, new DynamicDarkLaunchRule(config, parseRule(config)));
    }
  } else {
    darkLaunchRules.computeIfAbsent(serviceName, s -> new DynamicDarkLaunchRule(config, parseRule(config)));
  }
}
相比0.0.6-SNAPSHOT的代码,主要改动就是为了提升策略检查逻辑的性能,将解析完毕的DarkLaunchRule缓存起来,配置没有发生变化则直接使用缓存。
相关文章
- 基于-SLF4J-MDC-机制的日志链路追踪配置属性
ums: # ================ 基于 SLF4J MDC 机制的日志链路追踪配置属性 ================ mdc: # 是否支持基于 SLF4J MDC
- ajax-跨域访问
ajax 跨域访问 <!DOCTYPE html> <html xmlns:th="http://www.w3.org/1999/xhtml"> <head>
- 给第三方登录时用的数据库表-user_connection-与-auth_token-添加-redis-cache
spring: # 设置缓存为 Redis cache: type: redis # redis redis: host: 192.168.88.88 port
- Java动态代理
Jdk动态代理 通过InvocationHandler和Proxy针对实现了接口的类进行动态代理,即必须有相应的接口 应用 public class TestProxy { public
- Java读取classpath中的文件
public void init() { try { //URL url = Thread.currentThread().getContextClassLo
随机推荐
- 基于-SLF4J-MDC-机制的日志链路追踪配置属性
ums: # ================ 基于 SLF4J MDC 机制的日志链路追踪配置属性 ================ mdc: # 是否支持基于 SLF4J MDC
- ajax-跨域访问
ajax 跨域访问 <!DOCTYPE html> <html xmlns:th="http://www.w3.org/1999/xhtml"> <head>
- 给第三方登录时用的数据库表-user_connection-与-auth_token-添加-redis-cache
spring: # 设置缓存为 Redis cache: type: redis # redis redis: host: 192.168.88.88 port
- Java动态代理
Jdk动态代理 通过InvocationHandler和Proxy针对实现了接口的类进行动态代理,即必须有相应的接口 应用 public class TestProxy { public
- Java读取classpath中的文件
public void init() { try { //URL url = Thread.currentThread().getContextClassLo